How to Create a Wedding Seating Chart in 15 Simple Steps
If you need to create a seating chart for a wedding, don’t panic! By reading this guide, you’re already one step closer to wedding reception bliss. We’ve answered your most pressing wedding seating chart questions and broken down the process into small, easy-to-follow steps. You’ll also find instructions for creating a digital seating chart that will make the whole process smoother and more enjoyable. So whether you’re a couple planning your big day or a wedding planner in charge of the logistics, this guide is for you!
- Answers to Frequently Asked Questions
- Steps to Create a Seating Chart
- Creating a Digital Seating Chart
Prefer to listen to this post?
Answers to frequently asked questions about how to create a wedding seating chart:
Before we dive deep into the process of actually making a wedding seating chart, let’s get some of the most common questions and concerns out of the way.
How do you seat guests at a wedding reception?
Every wedding is unique. Each aspect of the event should be customized to fit the personalities of the happy couple. But there are a few best practices to streamline the task. We’ll get more into that in a little bit.
Do the bride and groom’s parents sit together?
It depends! Do they get along? If so, they’d probably love to share their happiness together on the wedding day. If they don’t prefer to celebrate together, seat them with other close relatives at separate family tables.
Should you assign seating at a wedding reception?
You might be wondering if a seating chart is even required. A good rule of thumb is, if there are over 75 guests or the reception features seated dining, a seating chart should definitely be used. But even if the wedding is smaller, a chart will make the event feel more organized. This empowers guests to relax and keep their focus on celebrating.
Which side of the room does each partner’s side of the family sit at reception?
If the wedding features a religious ceremony, the couple’s beliefs will determine which side of the family sits where. Also, it varies from culture to culture. For example, Christian ceremonies often place the bride’s family on the left while Jewish ceremonies seat them on the right.
Does the bride sit to the right of the groom?
Just like in the last question, the type of ceremony could decide which side the bride sits. Otherwise, it’s up to the couple!
[Tweet “If you need to create a seating chart for a wedding, don’t panic! Read this guide to achieve wedding reception bliss.”]
Does the bridal party have to sit together?
Nope! If the bridal party is made up of friends from all different areas of the couple’s life, consider seating them among guests they’ll feel most comfortable with. But if they do know each other or get along well, they’ll probably enjoy the experience of sharing a table. Either way, focus on who they’ll most likely want to sit with and go from there.
Do you need place cards at a wedding?
If there is a large wedding guest list, a seating chart will help coordinate everyone just fine. If your reception is on the smaller side, place cards will be more appropriate.
Now that you know the basics, let’s get started!
Discover how to create a wedding seating chart in 15 simple steps:
Just follow this process step by step for a painless seating chart experience. You can even print it out like a simple check list!
1. Get the floor plan.
Contact the wedding venue to get the full layout with details like space dimensions, electric outlet locations, and bathrooms.
2. Place the DJ or band, food, and other important party add-ons.
No one will be hungry for cake if the stand is next to a restroom.
3. Choose table shapes and sizes.
Have a realistic number in mind for how many people can comfortably ” and safely ” sit at each table. The venue or rentals company can assist with this.
4. Calculate the number of tables needed.
Look at the confirmed guest list, the number of tables that can fit in the space, and the number of people that can sit at each one.
5. Use a digital seating chart to place the guest tables.
Sticky notes and spreadsheets aren’t going to cut it when things get complicated. Check out our step-by-step instructions a little further down in this post.
6. Choose the wedding couple’s seat.
Couples should have first priority when it comes to seating. Some couples opt for a sweetheart table to avoid any awkward family drama. But if they prefer, they can also sit with close friends and family while they eat. No matter who the couple sits with, they should be near the center so no one has to strain to get a view.
7. Give VIPs special treatment.
Does the bridal party have a sweet tooth? Close proximity to the dessert table might be in order. Give the second-best seats in the house to parents or guardians. The wedding is a special day in their lives, too, so their seats should make them feel like they’re part of the action.
8. Tactfully arrange the remaining guests into groups based on how they know the couple.
Do they know them from school? Work? Yoga class? Seating people with similar interests will give them something to talk about. That being said, resist the temptation to play matchmaker – relationship status is not a good reason to seat people together.
9. Seat younger guests by the dance floor.
They’ll enjoy the loud music and the opportunity to bust a move. This also means that older guests might want to be farther away from the music, but still close enough that they can enjoy the fun, too.
10. Remember to leave extra space for wheelchairs.
Or anyone else who might need extra assistance.
11. More than 10 children? Have a kid’s table.
Place it in close proximity to all the parents so they can keep an eye on everything. Give kids some fun things to play with like bubbles or coloring books. You’ll also want to avoid putting them by the bar area … for obvious reasons.
12. Ask parents how to seat their friends or extended family.
Odds are they’re up-to-date on all the family gossip. At the very least, they’ll probably have a preference for who they get seated near.
13. Do your best to make people happy.
Let’s be honest: wedding seating charts won’t please everyone. But as long as people’s feelings are considered, they’ll know effort was put in.
14. Make or purchase a decorative seating guide for guests to reference on the day.
The seating chart is an extension of the wedding personality and part of the decor, so get creative! If assigning tables, use a chart. If assigning seats, use place cards.
Learn how to create a digital seating chart for a wedding:
Digital seating charts are a must-have for all wedding planning. Having a visual tool allows everyone to picture the final setup.
Writing one by hand might lead to more problems than it solves. Paper and sticky note charts just don’t have the same features and capabilities as digital ones. A digital seating chart for a wedding can be shared with key decision makers for better communication. It can automatically clean up messy guest files. And it allows important details like special needs and meal preferences to be added on. Plus, last-minute changes can be made, and updated versions can quickly be sent out so everyone stays on the same page.
Step 1: Select a great tool.
A great digital seating chart will have a few key features. Robust seating solutions will always be easy to use and offer clear instructions. They’ll also be collaborative, making it easy to invite other key decision makers to view the chart in real time so they can weigh in on placement of guests and seating. A great seating chart tool will also be adaptable. Updating guest lists and editing meal preferences should all be quick and painless, and help to keep you organized. Here at Social Tables, we offer all of this and more with our collaborative seating software.

Step 2: Perfect your layout.
Input the dimensions of the space into your diagram, upload a PDF of the venue’s floor plans, or choose from over 5,000 venues floor plans already in Social Tables. Add tables and their relative sizes. Play around with alternative wedding layouts to see how to arrange the band, buffet, and dance floor. Now is the time to experiment and see which layout feels the best. With a digital seating chart, you can create as many different versions as you like without having to start from scratch every time.
Step 3: Adjust the tables.

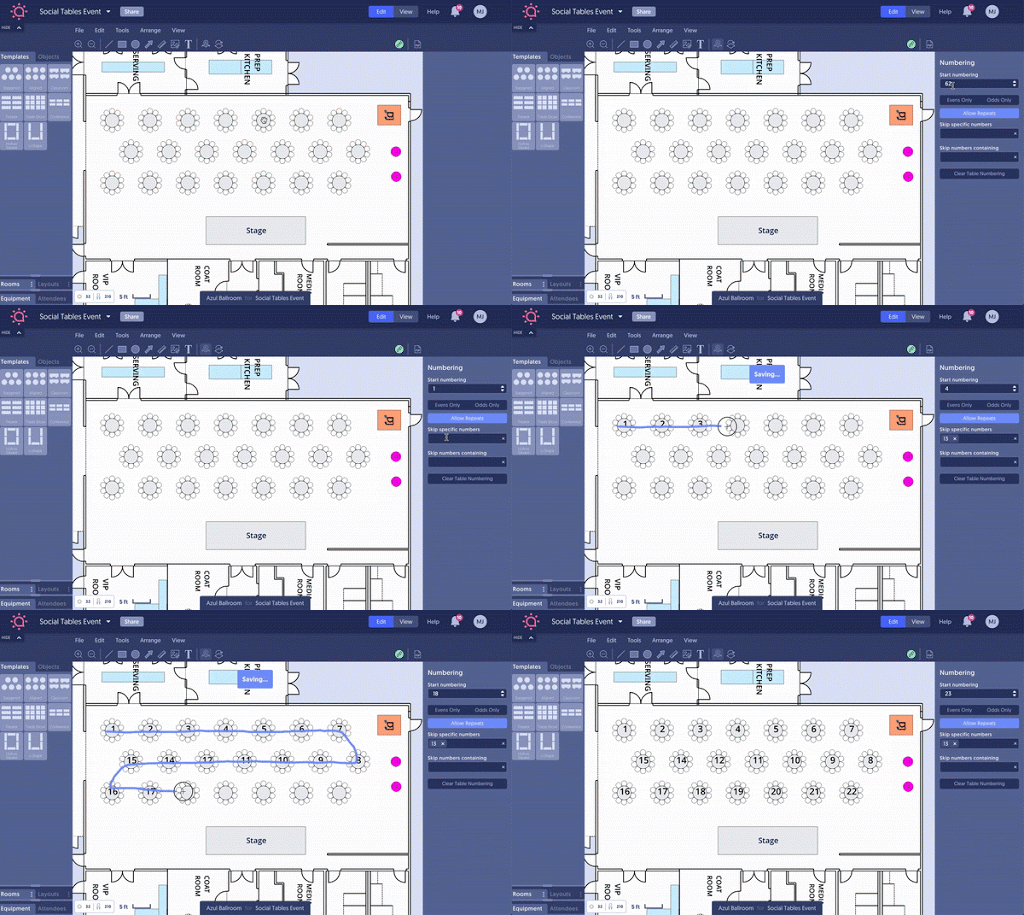
Add in table shapes, dimensions, and positioning. Number the tables by clicking and dragging across the tables in your diagram. You can skip numbers, clear your choices, and even skip numbers containing certain values as you go. You even have the option of using only even or odd numbers.
Step 4: Import the attendee list.

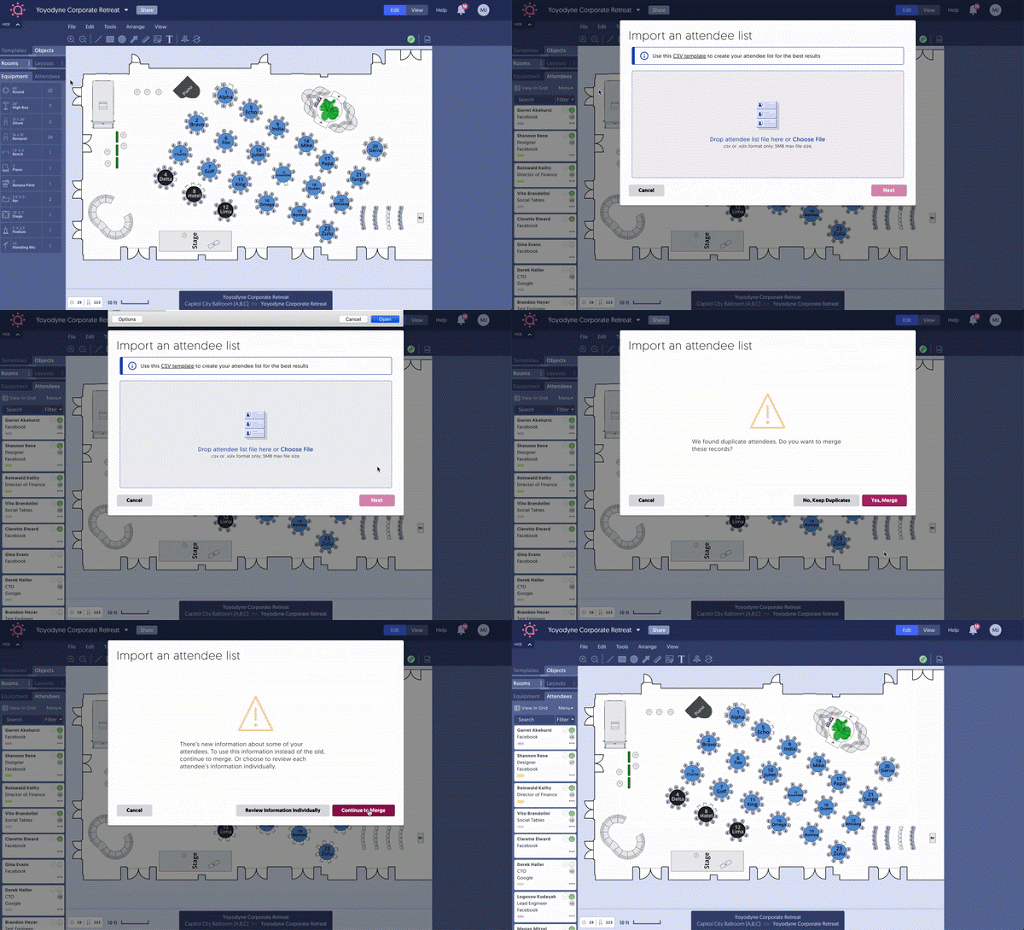
Upload the guest list in a few clicks, and choose whether you’d like to merge duplicates to clean up any messy info. Manage attendees by adding their organization, email, tags, meal choices, and more. Here you’ll also find information on what group number they are as well as their table number and seat after they’ve been assigned one.
Step 5: Add VIP and other customizable tags.

Tagging the in-laws and the bridal party as VIPs is easy. Just create a new tag and assign it to each name on the list. Later on you can sort your list and chart by these tags if you need to check on something. Viewing this list in spreadsheet form also makes the planning process easier so no one gets left off by accident.
Once your tags have been added, you can zoom in on guest information on the seating chart to do a final check that everything looks right.

Step 6: Drag and drop imported attendees to their seats.
You can also assign attendees by group or auto-seat everyone in a single click. Use the spreadsheet version to view your guests, and double check to make sure you’re not missing anyone.
Step 7: Add meals and make note of individual dietary restrictions.
There are several ways to edit attendee records at any point during your digital wedding seating chart creation process. Whether it’s clicking on their seat, the side panel, or on the chart itself, inputting guest details is a snap.
Step 8: Share with caterers, venue, rental, and other important decision makers.
They’ll be able to quickly gather information on the party and the space. If any changes need to be made, you can be confident that the whole team will be on the same page at all times, as your diagram will automatically update. The catering team can even sort guests by their meal preferences. Florists can plan out the number and positioning of their arrangements. And day-of coordinators can stay in the loop without missing a beat using real-time collaboration to see instant updates.
That’s how to create a wedding seating chart, simplified!
At the end of the day, there’s no such thing as a bad seating chart for a wedding.
Planning a wedding can be stressful, but making a seating chart doesn’t have to be when you use free table planning software. No matter how you plan to arrange guests, keep these main ideas in mind:
- Start with what you know. If there are religious elements to the wedding, there will be some helpful guidelines as to who sits where. Or if you’re certain grandma likes to boogie, make sure she gets a seat next to the dance floor.
- Not everyone will be happy. But as long as the couple is happy with the seating arrangement, that’s all that really matters.
- Choose safety over style. Keeping the tables a certain width apart or adding space for wheelchairs ensures that everyone is comfortable and well taken care of no matter what.
Don’t forget to check out Social Tables’ 3D wedding design software!

Quick answers about wedding seating charts:
First get the floor plan. Then, plot out how many tables you need and where they will fit. Pick the seats for the VIPs and arrange groups for everyone else. Make sure you are creating an accommodating environment for everyone.
We certainly recommend one! It doesn’t necessarily need to be super in depth, but a seating chart makes sure everyone is on the same page, and will help everyone to visualize the logistics of the event.

